Kubernetes Course Labs
Hackathon!
The hackathon is your chance to spend some decent time modelling and deploying a Kubernetes app on your own.
You'll use all the key skills you've learned in the course, and:
- 😣 you will get stuck
- 💥 you will have errors and broken apps
- 📑 you will need to research and troubleshoot
That's why the hackathon is so useful!
It will help you understand which areas you're comfortable with and where you need to spend some more time.
And it will give you an app that you modelled yourself, which you can use as a reference next time you model a new app.
ℹ There are several parts to the hackathon - you're not expected to complete them all. In some classes we have a whole day for this, in others just a few hours. Get as far as you can in the time, it's all great experience.
Part 1 - Welcome to Widgetario
Widgetario is a company which sells gadgets. They want to run their public web app on Kubernetes.
They've made a start - all the components are packaged into container images and published on Docker Hub. Your job is to get it running in Kubernetes for them.
Use this architecture diagram as the basis to model your YAML. It has the port numbers, Docker image tags and the number of replicas needed for each component:
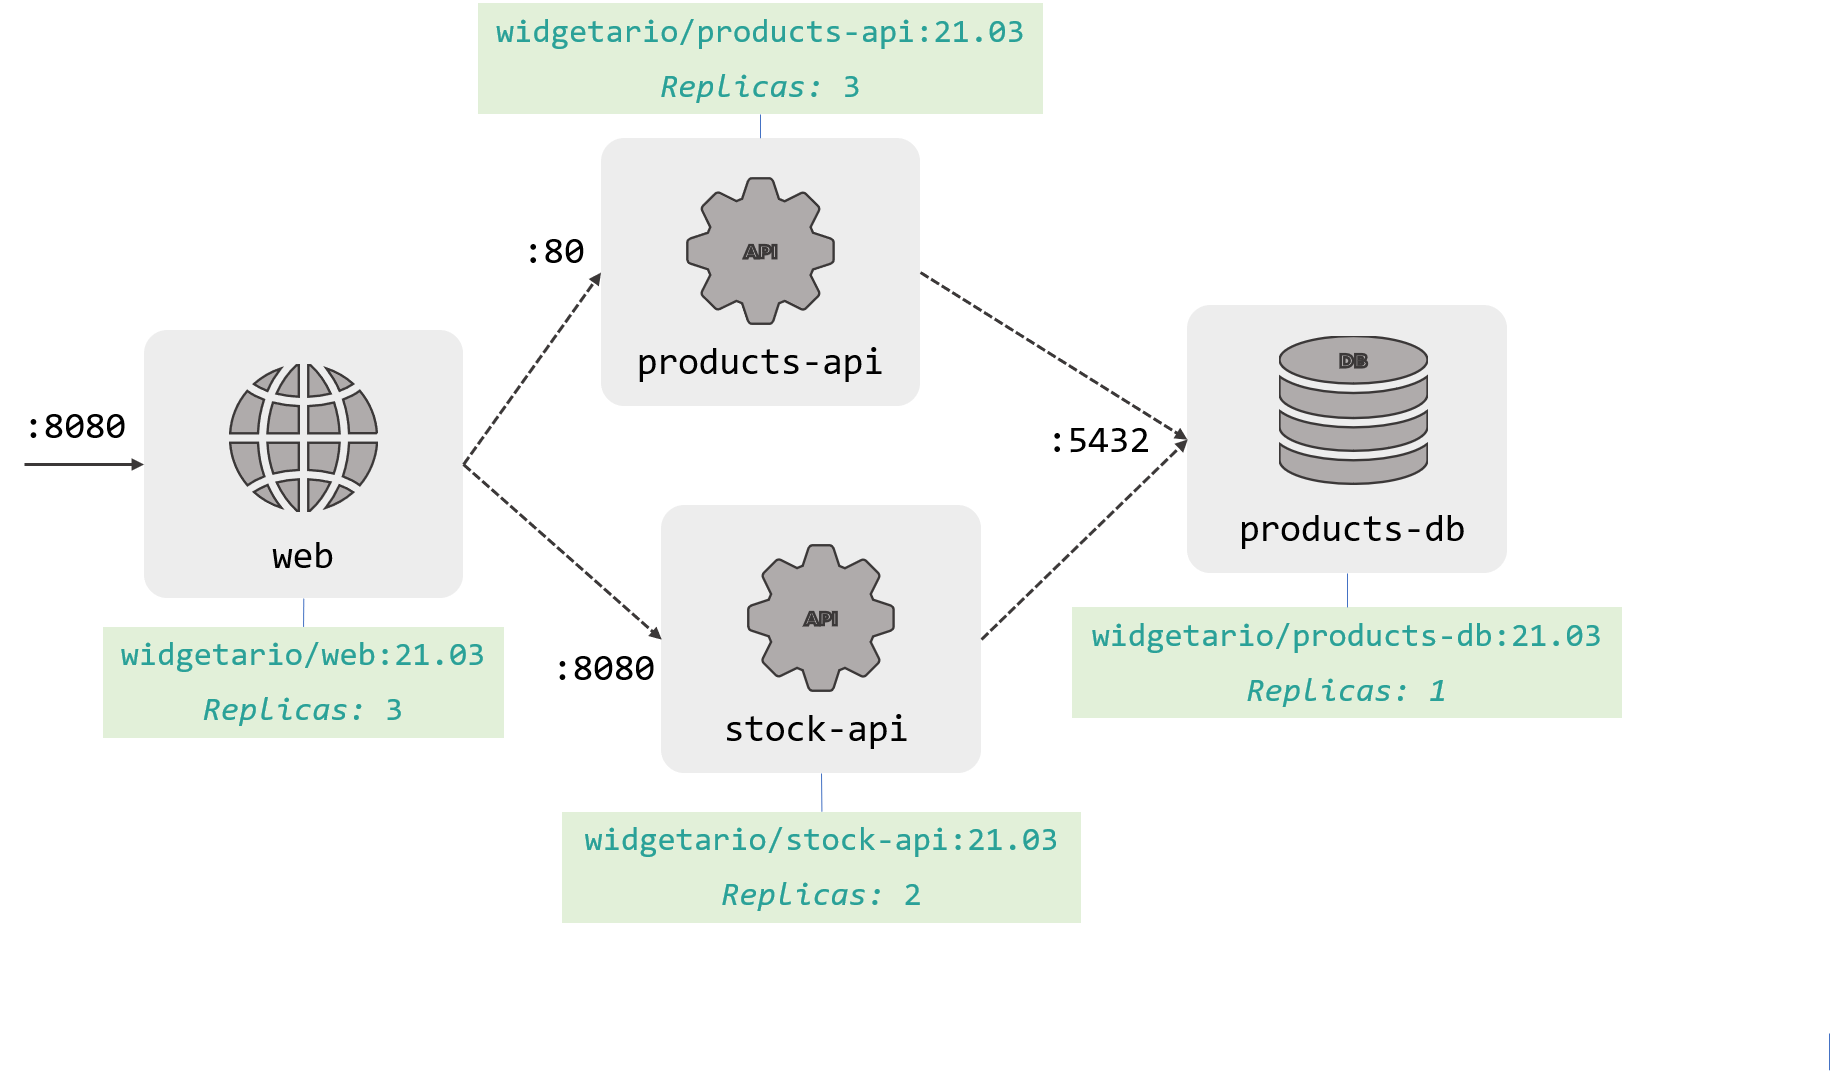
It's not much to go on, but it has all the information you need for the first stage.
The component names in the diagram are the DNS names the app expects to use. And when you're working on the YAML, it's easier to start with one replica for every component and get it working before you scale up.
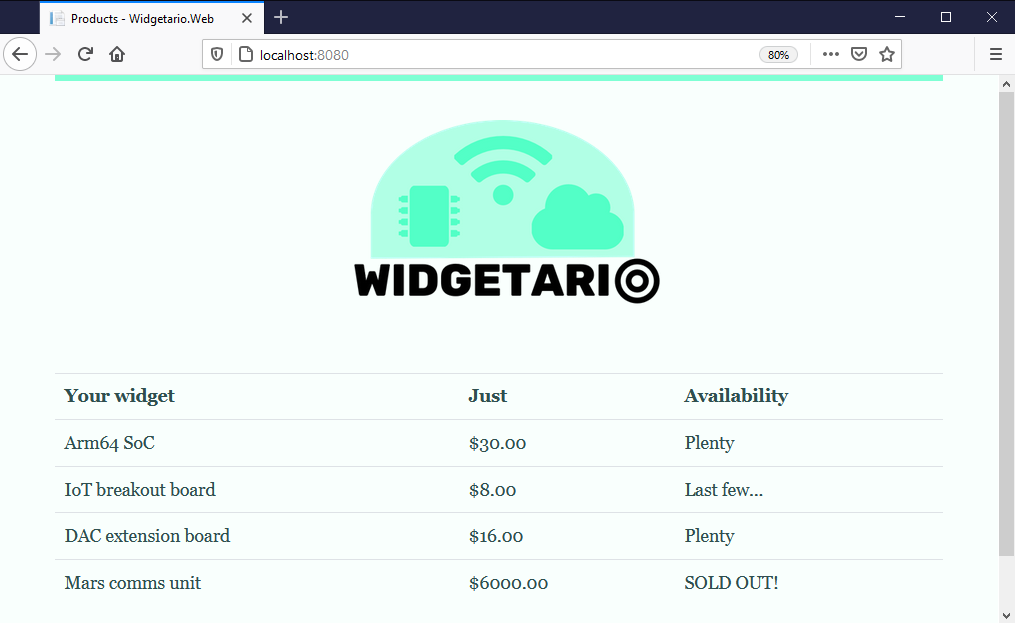
When you're done you should be able to browse to the Service port on your cluster and see this:
If you didn't get part 1 finished, you can check out the specs in the sample solution from hackathon/solution-part-1.
Deploy the sample solution and you can continue to part 2:
kubectl apply -f hackathon/solution-part-1/products-db -f hackathon/solution-part-1/products-api -f hackathon/solution-part-1/stock-api -f hackathon/solution-part-1/web
Part 2 - Configuration
Well done! Seems pretty straightforward when you look at the YAML, but now we need to go to the next stage and stop using the default configuraion in the Docker images.
Why? If you run docker image inspect widgetario/products-db:21.03 you'll see the database password is in the default environment variables, so if someone manages to get the image they'll know our production password.
Also the front-end team are experimenting with a new dark mode, and they want to quickly turn it on and off with a config setting.
You'll need to model configuration for all the components, but the product teams can't help so you'll need to figure out what goes where yourself.
-
Products DB is the simplest - it just needs a password stored and surfaced in the
POSTGRES_PASSWORDenvironment variable in the Pod (of course - anything with a password is sensitive data). -
The Stock API is a Go app. It uses an environment variable for the database connection string, and the password will need to match the DB. The team thinks the environment variable name starts with
POSTGRES. -
The Products API is a Java app. The team who built it left to found a startup and we have no documentation. It's a Spring Boot app though, so the config files are usually called
application.propertiesand we'll need to update the password there too. -
The web app is .NET Core. We know quite a lot about this - it reads default config from
/app/appsettings.jsonbut it will override any settings it finds in/app/secrets/api.json. We want to update the URLs for the APIs to use fully-qualified domain names. -
That feature flag for the UI can be set with an environment variable -
Widgetario__Theme=dark.
You have the app working from part 1, so you can investigate the current configuration by running commands in the Pods (printenv, ls and cat will be useful).
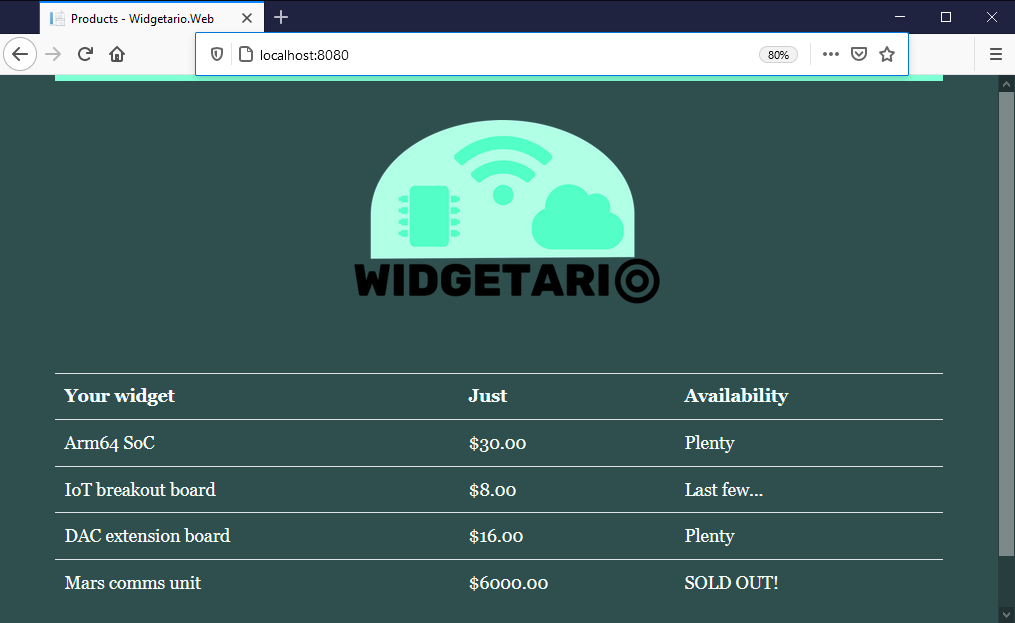
When you've rolled out your update, the UI will be updated but the products and stock details should be the same:
If you didn't get part 2 finished, you can check out the specs in the sample solution from hackathon/solution-part-2.
Deploy the sample solution and you can continue to part 3:
kubectl apply -f hackathon/solution-part-2/products-db -f hackathon/solution-part-2/products-api -f hackathon/solution-part-2/stock-api -f hackathon/solution-part-2/web
Part 3 - Storage
It's going well, but we need to think about storage.
The Stock API has a nice caching feature: when it fetches data from the database it stores a local copy in the filesystem. We want that cache to be kept available if the app crashes, but it doesn't need persistent storage - it's just a performance boost.
- the cache is already in use, writing files to
/cache. It just needs to be modelled so the data survives Pod restarts.
And the DB team are keen to spend more time looking at running Postgres in Kubernetes, with persistent storage for the data. They've built an alternative Docker image which can run a replicated database as a primary and a secondary.
-
this is the
widgetario/products-db:postgres-replicatedimage, and luckily we've already used it in this course so you can find a good sample to start with -
the replication setup needs the same Postgres password set in two different environment variables
-
the connection strings will need changing - the Products API should connect to the primary database server, but the Stock API only reads data so it can connect to the secondary
You'll need to change configuration for the APIs, but for the database you'll need to switch to a different type of workload altogether.
And if you have product-db data volumes from other labs, they'll need to be removed.
The app won't look any different if you get your update right. If not, you'll need to dig into the logs.
If you didn't get part 3 finished, you can check out the specs in the sample solution from hackathon/solution-part-3.
Deploy the sample solution and you can continue to part 4:
# remove the old database:
kubectl delete deploy products-db
kubectl delete svc products-db

# you may have some PVCs lingering from the labs:
kubectl delete pvc -l app=products-db

# deploy the new specs:
kubectl apply -f hackathon/solution-part-3/products-db -f hackathon/solution-part-3/products-api  -f hackathon/solution-part-3/stock-api -f hackathon/solution-part-3/web

# rollout the APIs to load new config:
kubectl rollout restart deploy/products-api deploy/stock-api
Part 4 - Ingress
We're nearly there, but all these non-standard ports are no good. We'd like to get some proper DNS names set up, so we can publish the web app and the products API on standard HTTP ports:
- the web app should publish to
widgetario.local - the products API shoud publish to
api.widgetario.local
Ingress controllers are generic components, so you can deploy one we used in an earlier lab. And remember how Kubernetes doesn't check to see if the port names match when you deploy Services and Pods? It doesn't check with Ingress objects either.
The app will still look the same from the new domains. If not, you'll need to look at endpoints and object descriptions.
If you didn't get part 4 finished, you can check out the specs in the sample solution from hackathon/solution-part-4.
Deploy the sample solution and you can continue to part 5:
kubectl apply -f hackathon/solution-part-4/ingress-controller -f hackathon/solution-part-4/products-db -f hackathon/solution-part-4/products-api -f hackathon/solution-part-4/stock-api -f hackathon/solution-part-4/web
Update your hosts file:
# Windows (run as Admin)
./scripts/add-to-hosts.ps1 widgetario.local 127.0.0.1
./scripts/add-to-hosts.ps1 api.widgetario.local 127.0.0.1

# Linux/macOS
./scripts/add-to-hosts.sh widgetario.local 127.0.0.1
./scripts/add-to-hosts.sh api.widgetario.local 127.0.0.1
- check the app at http://widgetario.local
- and the API at http://api.widgetario.local/products
Part 5 - Productionizing
All right!
We've commissioned a 200-node Kubernetes cluster in the cloud and we're ready to go.
Now's your chance to make any last updates to the Pod spec you think we need before we go to production.
No :)
This is up to you to see what you think is important.
If you didn't get part 5 finished, you can check out the specs in the sample solution from hackathon/solution-part-5.
My main focus in the samples is productionizing Pod specs:
- adding readiness and liveness probes
- setting resource limits
- increasing security
My changes are all in the Deployment and StatefulSet objects - if you diff the files between parts 4 and 5, you'll see where the changes are.
Deploy:
kubectl apply -f hackathon/solution-part-5/ingress-controller -f hackathon/solution-part-5/products-db -f hackathon/solution-part-5/products-api -f hackathon/solution-part-5/stock-api -f hackathon/solution-part-5/web
The StatefulSet rollout takes a few minutes, and the app may not be responsive until both Pods are up. And there are CPU resources in the specs, so if your cluster doesn't have enough capacity you may see Pods stuck in the Pending status, so you'll need to adjust the values.
And we're good to go.
Part 6 - Observability
Not quite. The SRE team won't let the app go live without any observability into the components. They want to confirm the app will integrate nicely with the standard stacks they use.
All the API and web servers publish metrics, so we don't need to change any code. To prove monitoring is usable you'll need to:
- run a monitoring stack with Prometheus and Grafana
- configure the Pod specs so Prometheus collects metrics - the database doesn't expose any metric but the other components do
- the app devs have said the Products API using a custom metrics path
/actuator/prometheus, and the web app might be running with a custom port - deploy the changes and check all the components are having metrics stored in Prometheus
- open Grafana and load the dashboard from
hackathon/files/grafana-dashboard.json; use the app and confirm all the visualizations show data.
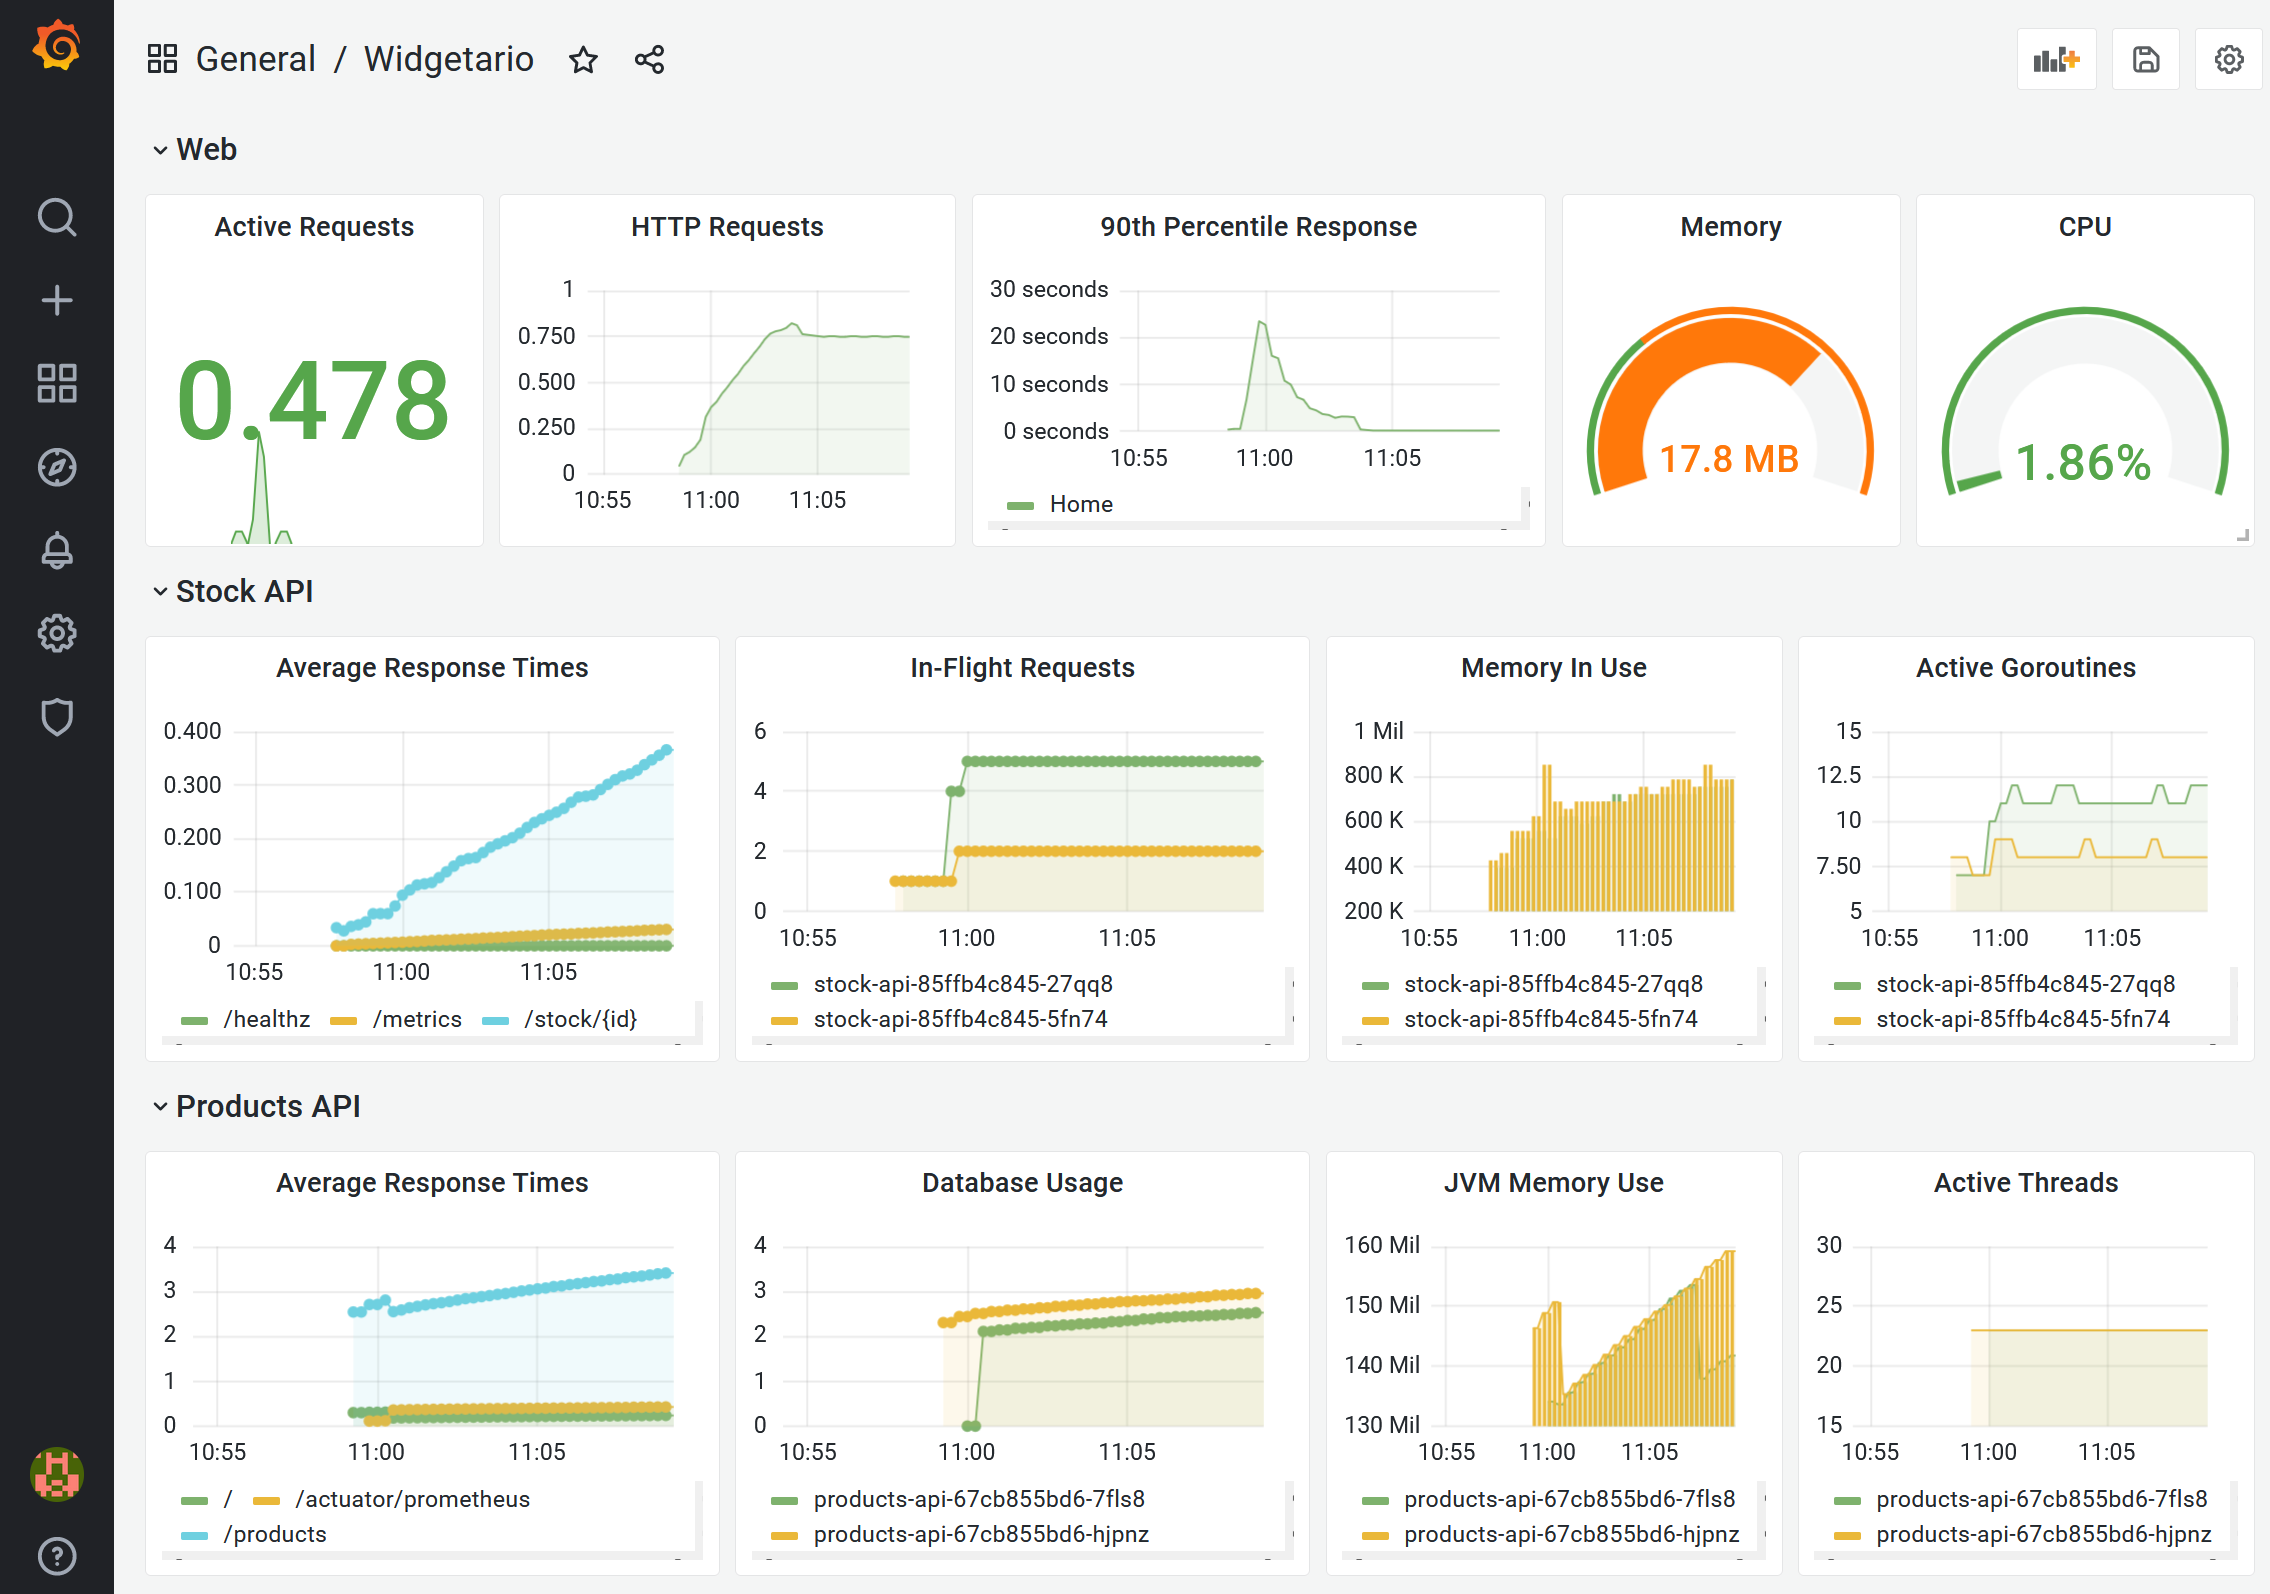
Here's the dashboard you should see:
And then you'll also need to set up centralized logging:
- run the EFK stack to collect and store logs in the app namespace
- the dev team say the web app writes logs to a file, so you'll need to add a sidecar container to print logs from
/logs/app.login the app container - open Kibana and load the dashboard from
hackathon/files/kibana-dashboard.ndjson; check the visualizations to see every component is writing logs
Here's what the Kibana dashboard should look like:

The monitoring and logging stacks are standard components, so you can run them from the specs we used in earlier labs.
You won't need to tweak the Prometheus or Fluent Bit configuration, unless you're using a custom namespace for your Widgetario Pods...
The app will still look the same. You should see those fancy dashboards and be able to search for logs for each component.
If you didn't get part 6 finished, you can check out the specs in the sample solution from hackathon/solution-part-6. The specs in the widgetario folder have been re-organised to have one YAML files for each component.
Deploy the sample solution and you can continue to part 7:
kubectl apply -f hackathon/solution-part-6/monitoring -f hackathon/solution-part-6/logging -f hackathon/solution-part-6/ingress-controller -f hackathon/solution-part-6/widgetario
There's a change to the StatefulSet spec (to explicitly opt out of metrics collection), and it will take a while for the rollout to complete.
You can browse to the UIs using NodePort or LoadBalancer Services:
kubectl get svc -A -l kubernetes.courselabs.co=hackathon
-
Grafana on http://localhost:30003 or http://localhost:3000
-
Kibana on http://localhost:30005 or http://localhost:5601
Part 7 - CI/CD
The last thing we need is a full CI/CD pipeline to build from source code and deploy to a test environment.
We've settled on Helm for packaging, so the first task is to work up the YAML specs into a Helm chart. The chart should support:
- multiple release in the same namespace
- variables for image tags, replica counts, and whether resource limits should be included
- app configuration per release, including the database password and the web theme
We'll be using standard deployments for the ingress controller, monitoring and logging stacks so you don't need to build Helm charts for those
Deploy a second instance of the Widgetario app in your cluster using Helm, with the values file hackathon/files/helm/uat.yaml. Confirm you can access it on a different port from the original, and all the Pods are talking to the right components.
Then we need to put together the continuous integration pipeline:
- we'll use Jenkins, BuildKit and Gogs to power the pipeline
- you'll need to create a registry Secret to push to Docker Hub (or your own registry)
- the source code is all in the
/hackathon/projectfolder, which is where you'll find the Jenkinsfile with the build steps already in it
You should be able to add your local Gogs server as a new Git remote and push this repository to it. Then your Jenkins build should build images for the database, APIs and web server and push them all to your container registry, with a version number in the tag.
So then we're ready to add continuous deployment:
- extend the Jenkinsfile to add the deployment steps
- use the Helm chart for deploying to a test namespace
- deploy the chart with the values file hackathon/files/helm/smoke-test.yaml
- the deployment needs to use the latest images which were pushed in the build.
Now when you trigger the build from Jenkins you should see a new version of the app deployed in your test namespace, running all the latest image versions.
If you've got this far, you probably don't need any hints :) The infrastructure stack we want to run is the same one we used in an earlier lab, so you can use those specs as the basis.
The default Jenkins setup from that lab creates a project which points to a different Jenkinsfile - you'll need to edit the path in the job.
You may be running low on resources, so you can scale down the existing deployment:
kubectl scale deploy/products-api deploy/stock-api deploy/web sts/products-db --replicas 0
And remember the registry secret needs to contain your own credentials, and the image name you build needs to use a repository which you have permission to push to.
If you didn't get part 7 finished, you can check out the specs in the sample solution from hackathon/solution-part-7. There's a helm folder with the chart, and an infrastructure folder with the CI/CD setup.
There are some more details for setting up and running the pipeline in the part 7 solution doc.
Cleanup
Uninstall your Helm charts, e.g:
helm uninstall -n widg-smoke widg-smoke

helm uninstall -n widg-uat widg-uat
And then delete objects - the sample solution applies a label we can select on:
kubectl delete all,ingress,cm,secret,pvc,rolebinding,clusterrolebinding,role,clusterrole,ns -l kubernetes.courselabs.co=hackathon

kubectl delete ns widg-smoke widg-uat